Published: August 20, 2020 Author: JasonDarkX2 Category: Tech,Tutorials
Huh, a simple post on how to assign a static IP address on your Windows 10 Computer. For those who like an organized network or simply want total control 😛 since I’m probably going to be referring back to this a lot in future posts, might as well make a post about it eh?
So, you’re probably wondering why on earth anyone would set a static IP Address. Well to simply put it a static IP is an IP address that doesn’t change, whereas the default configuration uses DCHP (Dynamic Host Configuration Protocol) automatically assigning IP addresses to your devices on the network. Are usually temporary addresses cause if your computer/device disconnects from the network, they’ll most likely be assigned a new IP address.
Therefore, if you’re running a business hosting web servers or networking between computers and port forwarding is at the forefront. Having your computer/devices reassigned IP addresses after a power outage is certainly going to be bad for business. Anyhoo, whatever the scenario you find yourself in that requires setting static IP address on your computer(s). It’s time to say hello to your new best friend in Windows Networking Administration, the ipconfig command 😀
Step 1.) Getting to know your network
So the first order of business is to figure out your network by using the "ipconfig" command.
you’re going need to open up a windows command prompt.
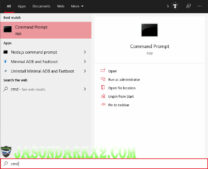
 Searching for command prompt
To get to command prompt, you can open the start menu and search for "cmd".
 Windows 10 ipconfig command(Ethernet Adapter)
Once in Command prompt, simply enter ipconfig and your network adapters information should be displayed. What you should be looking for is either your Wi-Fi and/or Ethernet adapter information. Make a note of your
Subnet Mask and
Default Gateway numbers which would come in handy when setting the static IP address.
Step 2.) Accessing your network adapter settings
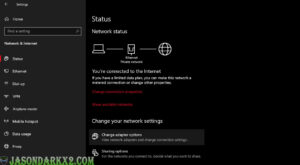
 Windows 10: Network & Internet Settings
In order to do this, head over to Network & internet settings. Which can be found under Start-> Settings or simply right clicking the network icon in your task bar.
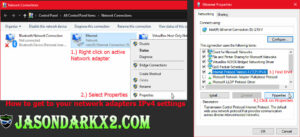
 How to get to your network adapters IPv4 settings
While in Network & internet settings Window
- select Change your adapter Options.
- Then right click on the network adapter in use and select properties.
- Look for "Internet Protocol Version 4" in the item list.
- Once selected "Internet Protocol Version 4" then click properties button.
Step 3.) setting the static IP address
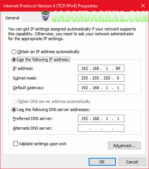
 Windows 10: Setting Static IP Address Example
Once at the IPv4 properties general tab.
- Select the “Use the following IP address:” radio button.
- Then enter a static IP address that’s not in use.
- Followed by subnet masks.
- Finally the default gateway.
As for the preferred DNS server, just enter that same value as your default gateway unless of course you have different DNS server elsewhere.
If you’re unsure of any of the required information, you can refer the information found in Ipconfig prior to setting the static IP address. If any of the fields are incorrect, your computer will be unable to connect to the internet. Once set, wait for your computer to reconnect to network with the static IP address. To verify simply use the Ipconfig command in command prompt.Cheers!!
Tags:
Computer Networking,
Windows,
Windows tutorial