Published: December 3, 2021 Author: JasonDarkX2 Category: Tech,Tutorials
So you got a Shield TV Pro, and a recently updated Windows 11 PC. But wondering how to remotely connect to your Shield TV Pro Internal/external Storage? In order to transfer and/or manage files in your Plex server hosted on your Shield TV. Well, thankfully the process is a lot simpler for Windows 11. Gone are the unusual network configurations and incompatibilities in Windows 10 with Windows 11.
For starters, here’s what you’ll need:
- Shield TV Pro or Shield TV.
- External storage drives, SSD/HDD (optional).
- SATA USB adapter (optional).
- A Windows computer.
I’d be using my Shield TV Pro for this guide since it has USB ports for external drives. Which I’d be covering how to connect that. Whereas the Shield TV has only the internal storage and MicroSD card slot. The methods are similar, Although I’d recommend an SSD if you plan to host a Plex server on your Shield TV Pro.
Step One - Setting up your Shield
If you got an external SSD/HDD it’s best to have it formatted and renamed on your computer before connecting it to your Shield TV Pro as the process of drive managing can be quite tedious on Android TV OS.
Oh do remember to rename your drive to something easy to remember as it will be handy later on. Once ready simply choose either USB port on the Shield TV Pro. The one closest to HDMI port or away from the HDMI port. Be sure to make note of it so you can set the power option for that USB port.
To set the USB power options Simply follow these steps:

- Head over to Settings.
- Select Device Preference.
- Select Systems.
- Scroll to the bottom.
- For the port that your external storage is connected to select Always On
Otherwise, off while sleeping. Having the port “Always On” will allow your storage to be accessible by Plex if you plan to host and/or manage your media on the drives without having to turn on your Shield TV Pro. It also reduces the chance your storage drive permissions reset, resulting a permission denied error when attempting to connect to it.
Step Two - Setting up the connection.

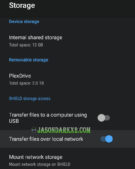
Now that the step is complete, it’s to set up the Shields storage for local connection. Simply head back up to Device Preference and select Storage instead. Scroll to the bottom Shield Storage access and enable Transfer files over local network.
Once enabled, a panel with your server info and credentials will appear. You can change the username to whatever you want. But the password is auto generated. You can keep the regenerating password until you find one you like. Make note of all the information as you’ll be needing it in the next step.
Step Three - Connecting to Shield on your PC
When you’ve finished with the Nvidia Shield portion. It’s time to head over to your PC where the fun begins. To start simply boot up your PC and open File Explorer.
Select the address bar and enter your Shield TV Pros IP address in the following format (replace the x’s with your Shields IP address): \\xxx.xxx.x.xxx

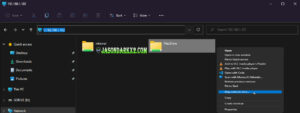
It will ask for a username and password. This information is found on Shield TV Pro, Transfer files over local network option if you need to refer to it again. Once entered correctly, you’ll be able to access your Shield’s internal storage and external storages connected to it. Verify that you can properly access the drives. Afterward, you may want to map the drive(s) for easy access.
Simply right-click on the drive folder icon you want to map, click on show more options and select the "Map network drive…" option, follow the prompts. If successful your network drive will appear in file explorer, under "This PC", as a Network Locations.
Troubleshooting
While I haven’t encountered any major problems using Windows 11 to connect to my Shield TV Pro network storages. Here are some troubleshooting solutions in case, if you do run into something similar.
Getting permissions error, while trying to rename a folder and/or transferring files.
If everything was set properly prior. In most cases the permissions on your Shield TV Pro storage got reset during sleep. Simply reboot the Shield TV Pro or just simply turn off and on the transfer files over local network settings should fix it.
Changed Shield TV Pro network username/password and/or entered the incorrect credentials on Windows.
You can remove or edit the stored credentials using Credential Manager.
- Simply open up start menu and search for Credential Manager.
- Launch Credential Manager
- Select Windows Credentials.
- Look for your Shield TV Pros IP address under Windows Credentials section.
That's all Cheers!!
Tags:
nvidia,
Nvidia Shield TV,
Nvidia Shield TV Pro,
tech tutorial