Published: August 28, 2020 Author: JasonDarkX2 Category: Tech,Tutorials
Last Updated: November 13, 2020
Wondering how would you put a computer running WAMPServer online? Well, you are in luck. Following this tutorial should get you up in no time.
Before going any further, if haven’t already installed WAMPServer you many follow this tutorial:
How to get WampServer to work on Windows 10
Step 1.) Network- figuring out your Computers IP address
So the first order of business is to figure out your machines IP address.
To figure out your machine IP address you’re going need to open a windows command prompt.
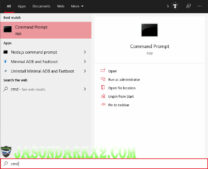
 Searching for command prompt
To get to command prompt, you can open the start menu and search for "cmd".
 Windows: ipconfig command
Once in command prompt use the command ipconfig and make note of your
IPv4 Address, this is your machines IP address. We’ll need it later for setting up the virtual host on Apache.
Optionally, you can assign a static IP for your computer. So that the IP address is permanent and isn’t reassigned a new IP address upon re-connection.
If you wish to do so feel free to take a look at this How to assign a static IP address on Windows 10
Step 2.) Configuring WAMPServer virtual hosts
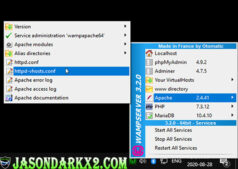
 WAMPServer: Finding Apache vhosts.conf
Once your computer basic network setup is sorted out and/or properly configured. It’s time to set up the WAMP virtual hosts for Apache. To start launch your WAMP Server, click the WAMP icon in the taskbar. open up the Apache menu and look for
"httpd-vhosts.conf" option. choosing that option should open the vhosts configuration text file.
The following is the default configuration:
# Virtual Hosts #<VirtualHost *:80>
  ServerName localhost
  ServerAlias localhost
  DocumentRoot "${INSTALL_DIR}/www"
  <Directory "${INSTALL_DIR}/www/">
    Options +Indexes +Includes +FollowSymLinks +MultiViews
    AllowOverride All
    Require local
  </Directory>
</VirtualHost>
What you would want todo is set the configuration to allow Apache server to be accessible outside of localhost.
To allow to accessed through computer IP Address on private network. Your vhost configuration would look something like this:
<VirtualHost *:80> ServerName  [Enter your Server Name here]
  ServerAlias [Enter your computer IP Address]
  DocumentRoot "${INSTALL_DIR}/www/[Enter Website directory name here]"
  <Directory "${INSTALL_DIR}/www/[Enter Website directory name here]">
    Options  +Includes +FollowSymLinks +MultiViews
    AllowOverride All
    Require all granted
  </Directory>
</VirtualHost>
if you want to use a domain name and have it accessible with different names. For example http://domainname.com and/or www.domainName.com. The configuration looks like this:
<VirtualHost *:80> ServerName  domainName.com
  ServerAlias  domainName.com *.domainName.com
  DocumentRoot "${INSTALL_DIR}/www/website"
  <Directory "${INSTALL_DIR}/www/website">
    Options  +Includes +FollowSymLinks +MultiViews
    AllowOverride All
    Require all granted
  </Directory>
</VirtualHost>
Step 3.)Allow inbound traffic through Windows firewall
After completing vhosts configurations, it’s time to create a firewall rule that allows inbound traffic through port 80. This will allow access to the webserver from within the network and your computer will start listening for port 80 requests once the rule is enabled.
To begin, head over to your start menu.
- Search for “Windows Defender Firewall with Advanced Security”
- Open the Windows Defender Firewall with Advanced Security app.
- On the left panel right click on Inbound Rules.
- Select New Rule.
While in the New Inbound Rule Wizard use the following options:
- Rule Type:Port
- Protocol and Port: TCP, specific local port: 80
- Action: Allow the connection.
- Profile: check all that applies. If you’re just hosting either Private or private check would suffice.
- Name: whatever you like 😛
Enable the rule and you should be good to go.
Now when you enter the IP address of your computer requesting port 80 like so:
http://[ your computers IP Address]:80
Alternatively, if you would like to use a hostname instead of entering the IP address for LAN development. You’re going have to edit the Windows hosts file over at “C:\\Windows\System32\Drivers\etc\hosts” (Note: Administrative rights required to modify this file) to allow your computer to properly resolve the address.
An example of a custom host:
127.0.0.1 localhost
192.168.1.83 example.com
192.168.1.83 www.example.com
Afterwards,you'll be able to see your website from any computer within your LAN.
Step 4.) Putting the Server online
The final step is to put your WAMP server online for public access. Port forwarding port 80 to point to your web server is required. In order to do this the first step is to login to your router using the default gateway Address. The username is admin and password is blank unless specified otherwise in the manual or by your network administrator. Find the port forwarding section and add the following port:
- Your web server IP address.
- Port range: 80
- protocol:TCP
NOTE: Some ISP (Internet Service Provider) may have port 80 blocked. Please ensure that it's not blocked before attempting to port forward port 80.
Afterwards you can access your website through your public IP address. If you don’t know your public IP address simply search what’s my IP on google. If you have a domain name that wish to point to your server. Simply add a DNS “A” record having the domain name point to your web server via public IP address. If successful your WAMP server should be online and publicly accessible. Cheers!!
Tags:
WAMP,
WAMPServer,
Web Development,
Windows